
Particleboard Cutting Calculation: How to Get an Optimal Layout with Less Waste
Saw kerf, edge margin, offcut priority and cut direction — four settings that decide how many sheets a project consumes. Here is what each one does, and where material quietly disappears.
A particleboard cutting calculation answers one question: how do you fit rectangular parts onto rectangular sheets so that fewer sheets are used and whatever is left over is still worth keeping? You can work it out on paper, but one extra shelf or a change of edge banding sends you back to the start. Calculating online removes that chore: the conditions are set once and a recalculation takes seconds.
Below we go through what feeds the calculation, how the layout modes differ, how to read the result, and why some material ends up as waste even when the layout looks tight. The examples are real screens from the app.
Four settings that decide the outcome
Before the algorithm places anything, it needs the conditions of the problem. There are four, and every one of them moves the final sheet count.
- Saw kerf. The material the blade removes between neighbouring parts. The default is 3 mm, and the allowed range is 0 to 10 mm. Across a couple of dozen cuts, the gap between 3 mm and 4 mm adds up to centimetres — exactly what the last part in a row will be missing.
- Edge margin. How far parts stay away from the sheet edge; 10 mm by default. If the edge is damaged unevenly, switch on free margins and set all four sides separately.
- Cutting priority. "Use offcuts first" makes the algorithm consume what is already in the workshop; "use new sheets first" keeps offcuts in reserve. The first option is the default and is usually the cheaper one.
- Cut direction. Along the length of the sheet or along its width. It looks cosmetic, but on elongated parts — wardrobe side panels, for instance — switching direction changes the sheet count.
How to calculate a cutting layout in six steps
The sequence is the same for a ten-part wardrobe and a hundred-part kitchen. The wizard runs step by step, and you can go back and correct the data at any point.
Saw kerf, edge margin, offcut priority. The same screen holds the default edge banding types and drilling settings.
Material type, thickness and sheet size. You do not enter a quantity — the calculation tells you how many sheets are needed.
Unlike sheets, an offcut has an explicit quantity — it is a specific piece sitting in your workshop. It inherits the material and colour of its parent sheet.
Quick entry follows the order length, width, quantity, name. Tab moves to the next field, Enter adds the row. An existing part list can be imported from Excel — .xlsx and .xls files are accepted.
"Length" and "Width" lock a part against rotation, which is how you control grain direction. "Auto" lets the algorithm compare both orientations and keep the tighter one.
Changing the mode, the starting corner or the goal clears the previous result — after any edit the calculation has to be run again.
The Sheets, Parts and Edges steps are covered screen by screen in the guide Sheets, parts, offcuts.
Optimisation modes and what they aim for
The mode sets the logic by which parts land on the sheet. Two modes are available on any plan, the third on Pro.

- Along the sheet length. Guillotine cuts run along the length first, and parts are laid out in rows following that direction.
- Along the sheet width. The same logic with width as the main direction. It packs better when parts are elongated across the sheet.
- Optimal (ILP). An integer linear programming algorithm that searches for a tighter layout against a chosen goal — minimum waste, minimum sheets or minimum cuts. It takes longer to compute and is available on the Pro plan.
The three goals solve different problems. Minimum sheets saves on purchasing. Minimum waste leaves you with larger reusable pieces. Minimum cuts shortens machine time, which matters when cutting is billed per cut. There is no universal answer: the best layout for the material bill and the best layout for the cutting bill are two different layouts.
Optimisation software works through the variants faster than anyone can by hand, so it is always worth comparing them. A practical habit: run the project in every available mode and compare the "sheets used" figure. Each calculation takes seconds, and a difference of a single sheet pays for the time. How modes and starting corners work is covered in Three cutting modes.
How to read the result
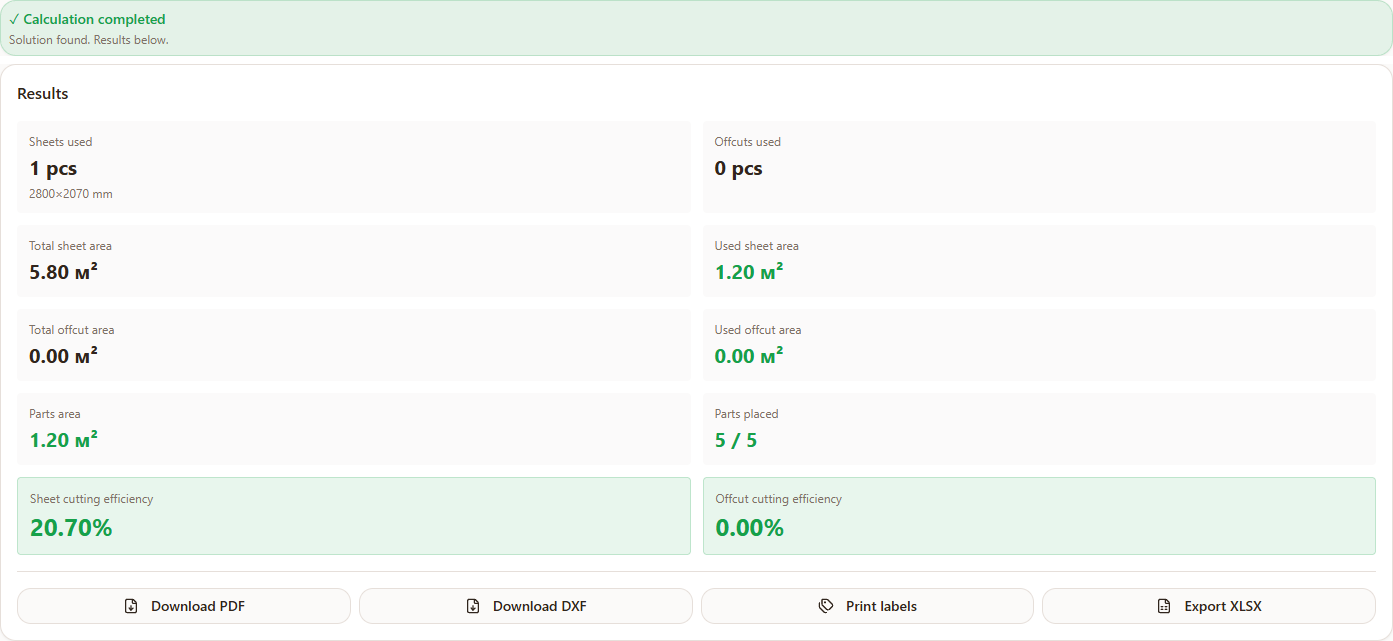
Statistics appear under the layout once the calculation finishes. Read them as a set of three, not as a single number.
- Sheets and offcuts used. The number that drives your purchase. If the project has no offcuts, that row stays empty.
- Parts placed. Shown as "48 / 50". A mismatch means some parts did not fit — usually because a part is larger than the sheet once edge margins are taken into account.
- Cutting efficiency. The share of usable area as a percentage, reported separately for sheets and offcuts. Treat it as a reference point, not a grade: large panels reach high percentages, small trim parts never will.
Efficiency is worth comparing not against someone else's numbers but against your own earlier run of the same project in a different mode. That difference is what tells you whether the optimisation actually gained anything.
Remnants and waste: where material is lost
Everything that did not become a part falls into one of two buckets, and the difference between them affects the cost of your next project.
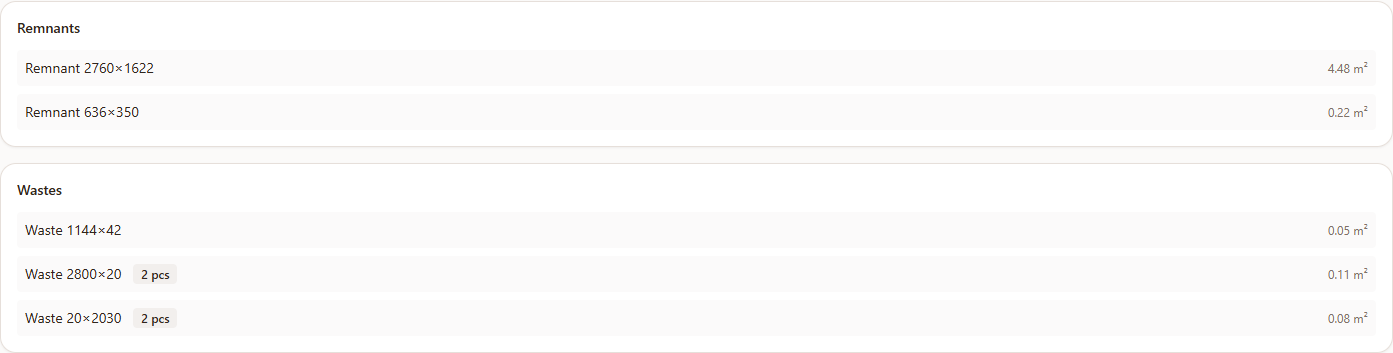
- Remnants — pieces larger than the minimum size set in your profile. Save them and add them as offcuts to the next project.
- Waste — pieces below that minimum, plus the trim strips along the edge margins. Nothing recovers this part.
Which leads to a counter-intuitive conclusion: a layout with slightly lower efficiency can be the better one if what it leaves behind is a single whole piece rather than five narrow strips of the same total area. The strips go in the bin; the piece goes into the next wardrobe.
Four mistakes that ruin a calculation
- Kerf left at zero. The layout looks perfect, and then the last part in the row comes up short on the machine. Zero only makes sense where the cut genuinely removes no material.
- Edge banding not included in the sizes. A part with 2 mm banding on two sides grows by 4 mm. Either account for it in the dimensions yourself, or switch on the automatic edge deduction available on Pro.
- Every part set to "Auto". Density improves, but on boards with a visible grain some parts will be rotated across the pattern. Fix the direction manually for fronts and exposed side panels.
- Offcuts left out of the project. The most common way to lose money: the material is in the workshop, but the algorithm does not know about it and reaches for a new sheet.
Not just particleboard
The algorithm works with the geometry of a sheet rather than its composition, so cutting runs the same way for every supported panel. The material catalogue covers laminated particleboard, MDF and plywood, each with its own thicknesses and formats.
For plywood and MDF, pay attention to the kerf: a router bit usually removes more material than a saw blade, so the default value needs raising.
More on cutting
Deeper dives into individual cutting topics — here and in the knowledge base.
The cutting calculator runs in your browser — there is nothing to install.
Go to sheet cuttingIf you are comparing tools rather than preparing a job, see how an online service differs from desktop cutting software.
Frequently asked questions
What saw kerf should I use if I do not know the exact value?
Leave the default of 3 mm, which is typical for a panel saw. The exact figure is best confirmed with whoever cuts your material; the setting accepts anything from 0 to 10 mm.
Can I calculate a cutting layout for free?
Yes. The "along the length" and "along the width" modes, the calculation itself, the cutting map and PDF and Excel export are all on the free plan. The Optimal (ILP) mode, DXF export and label printing are Pro features.
What is the difference between remnants and waste?
Remnants are pieces larger than the minimum size set in your profile and can be reused as offcuts in later projects. Waste covers everything smaller than that, plus the trim strips along the edge margins.
Which mode gives the best layout?
It depends on what counts as a win. Minimum sheets saves on material, minimum waste leaves larger reusable pieces, minimum cuts shortens machine time. The reliable approach is to run the project in several modes and compare the number of sheets used.
Is edge banding thickness taken into account during layout?
By default the layout uses exactly the part sizes you entered. On the Pro plan you can enable edge deduction, which shrinks each part by the thickness of the banding assigned to it.
Can I calculate cutting for plywood and MDF?
Yes — the material catalogue includes laminated particleboard, MDF and plywood. The layout algorithm is identical for all sheet materials; what changes is thickness, sheet format and usually the kerf.
A cutting calculation is not the search for one correct number. It is a trade-off between sheets bought, cuts made and the quality of what is left over. The tool runs the variants in seconds; deciding which one is cheaper for you is still your call.