
Three cutting modes
How to pick a cutting mode — along sheet length, along sheet width, or optimal ILP — set a start point and edge deduction, run the calculation, and read the results.
What this page is
The "Calculation" step of the cutting wizard — where you choose exactly how the algorithm packs parts onto sheets, run the calculation, and see the result: the cutting map and material-usage statistics. Settings on this step don't change the list of parts or sheets — they only decide the packing logic.
When to use it
- To get the final cutting map once sheets, parts, and edging are already entered.
- To compare how the layout changes depending on cut direction or starting corner.
- On the Pro plan, to let the algorithm pick the layout for a specific goal — minimum waste, sheets, or cuts.
Where it is
Cutting-project wizard → the "Calculation" step
How to use it
"Along sheet length" is selected by default.
Both options carry a FREE badge and are available on any plan.
An extra "Goal:" choice appears — "Minimum waste", "Minimum sheets", or "Minimum cuts"; on the free plan the row is visible but blurred, and clicking it opens an offer to upgrade to Pro.
"Top-left", "Top-right", "Bottom-left", or "Bottom-right" — the algorithm starts packing parts from that corner.
The switch automatically shrinks a part by its edging thickness during packing — useful if the part sizes in the project already include the finished, banded dimension.
The same button covered in the "Creating a cutting project" article — on the "Calculation" step it runs the calculation instead of moving to the next step.
While it runs, a progress bar shows the percentage complete.
The banner confirms a solution was found; below it is a preview of the cutting map and tiles with numbers for sheets, offcuts, and efficiency.
Changing the mode, start point, or goal clears the previous result — you'll need a fresh calculation.
Interface overview
The "Cutting mode" card
Three modes; whether the two Pro modes show up at all depends on features enabled on the server.

The screenshot above shows only the two free modes — "Optimal (ILP)" only appears in the interface if that feature is enabled on the server; if it's missing entirely, it just means your server hasn't turned it on yet, not that it's unavailable to you personally.
- 1"Along sheet length" — guillotine cuts run primarily along the sheet's length; free.
- 2"Along sheet width" — the same guillotine logic, but the main cut direction is the sheet's width; free.
- 3"Optimal (ILP)" — a more advanced integer-linear-programming algorithm; Pro plan only. Inside it, a goal choice: "Minimum waste" (default), "Minimum sheets", "Minimum cuts".
Both free modes lay parts out in rows along the chosen cut direction first; "Optimal" searches for a tighter layout for the chosen goal, at the cost of a longer calculation.
The "Start point" card
The corner of the sheet where the algorithm starts packing parts.

- 1"Top-left" / "Top-right" — packing starts from the top edge of the sheet.
- 2"Bottom-left" / "Bottom-right" — packing starts from the bottom edge of the sheet; selected by default.
The "Deduct edging from part size" card
A Pro-plan switch next to the calculation settings.

When on, the algorithm shrinks a part by the thickness of its assigned edging during packing — on the free plan the switch is visible but disabled, with a Pro badge next to it.
Calculation results
Appear after tapping "Calculate" and a successful calculation.
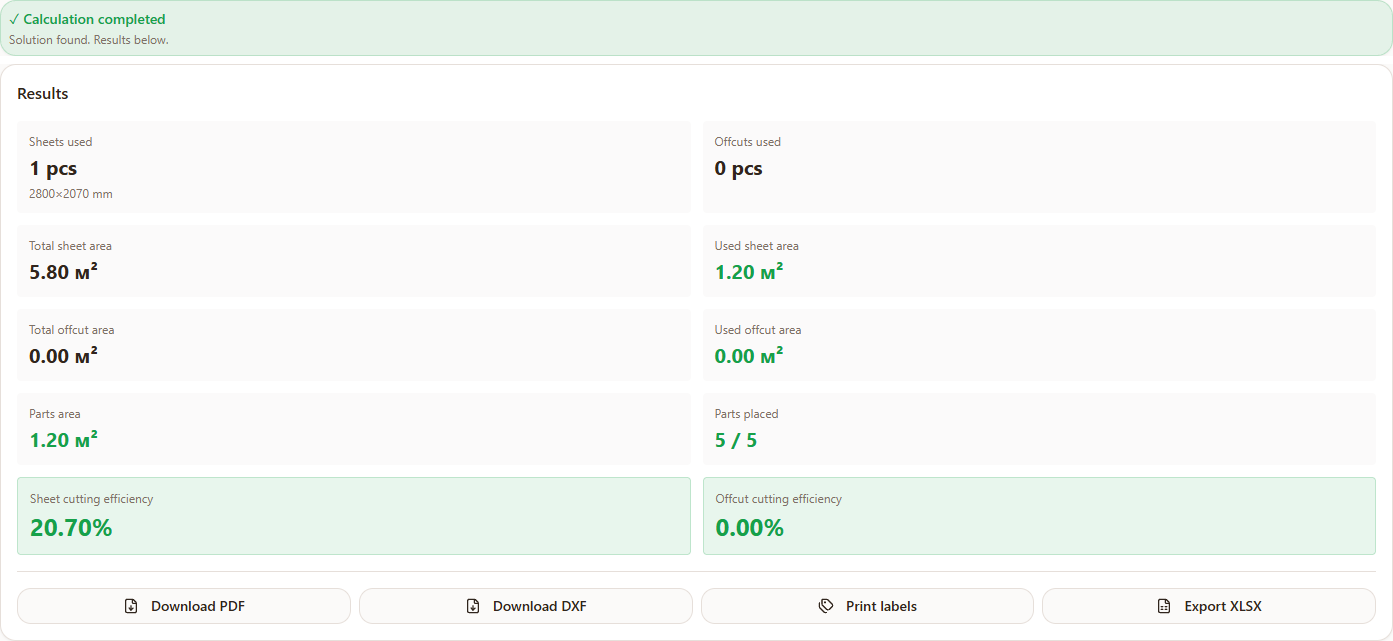
- 1"✓ Calculation completed" — a green banner confirming a solution was found.
- 2Cutting-map preview — the "Cutting canvas" — the same map shown in the editor, but you can't drag or rotate parts here; it has its own display buttons, covered below.
- 3"Sheets used" / "Offcuts used" — how many sheets and offcuts the layout consumed.
- 4Sheet, offcut, and part areas — total and used sheet area, total and used offcut area, parts area.
- 5"Parts placed" — how many parts were placed out of the total requested, e.g. "48 / 50".
- 6"Sheet cutting efficiency" / "Offcut cutting efficiency" — the useful-area share, as a percentage.
The "Cutting canvas" — display buttons
A bar right above the cutting map itself, at the top of the results.

- 1"Color" / "B/W" — switches the map between color-by-material and a black-and-white diagram.
- 2"Dimensions" — shows or hides size labels on parts.
- 3"Edges" — shows or hides edging marks on parts.
- 4"Drillings" — shows or hides drilling marks on parts.
- 5Zoom percentage and "+"/"–" — the current zoom level and buttons to zoom in or out on the map.
This canvas is view-only — parts can't be dragged or rotated here. To adjust the layout by hand, use the separate editor — see the "Cutting map editor" article.
Below the results are the export buttons — covered in detail in the "Exporting PDF / Excel / DXF" article.
Possible errors
| What you see | Why it happens | How to fix it |
|---|---|---|
| "Calculation failed. Please try again." | A temporary calculation hiccup | Run the calculation again with "Calculate"; if it keeps happening, check that no part is larger than every available sheet. |
| The "Optimal (ILP)" mode is blurred and can't be selected | The mode is a Pro subscription feature | Upgrade to Pro, or use the free "Along sheet length" / "Along sheet width" modes. |
| The "Deduct edging from part size" switch is disabled | The feature is Pro-only | Upgrade to Pro if you need the algorithm to automatically account for edging thickness during packing. |
| The calculation result disappeared after changing a setting | Expected behavior — any settings change on this step clears the previous calculation | Tap "Calculate" again to get a cutting map with the new settings. |
Tips
- Start with a free mode — "Along sheet length" or "Along sheet width" give a fast, predictable result for most projects.
- Compare both free modes — for the same set of parts, one of them usually produces less waste; switch and recalculate to see the difference.
- On the Pro plan, try different "Optimal" goals — "Minimum waste" doesn't always match "Minimum sheets", especially with a small number of parts.
- Change the start point if the layout looks awkward to cut — for example, so long cuts run from the edge of the sheet that's easier to feed into your saw.
Frequently asked questions
What's the difference between "Along sheet length" and "Along sheet width"?
Both are guillotine cutting (cuts run all the way across the sheet), but the primary cut direction differs — one runs along the sheet's length, the other along its width. For the same set of parts, results can differ noticeably.
What does "Optimal (ILP)" mode do?
It uses a more advanced integer-linear-programming algorithm that searches for a layout matching your chosen goal — minimum waste, minimum sheets, or minimum cuts. Pro plan only.
What is the "Start point" for?
It sets the corner of the sheet where the algorithm starts packing parts. For the guillotine modes this affects the final layout, and sometimes how convenient the cuts are on a particular saw.
What is "Deduct edging from part size"?
A Pro feature: when on, the packing algorithm shrinks a part by the thickness of its assigned edging, so the finished, banded size matches what's specified in the project.
Why did my calculation results disappear after I changed a setting?
That's expected — changing the mode, goal, start point, or edge deduction clears the previous calculation, because the layout could change. Tap "Calculate" again.
What does "Parts placed: 48 / 50" mean?
Out of 50 parts needed, the algorithm placed 48 — for example, because there wasn't enough material. Add a sheet or offcut and run the calculation again.
Where do my results go if I go back to the "Parts" step?
If you actually changed the list of parts, sheets, or edging, the calculation resets by the same logic as changing a setting on the "Calculation" step: the input data changed, so a fresh calculation is needed.