
Exporting PDF / Excel / DXF
How to download a cutting map as PDF, export a spreadsheet to Excel, get a DXF for a CNC machine, and print part labels.
What this page is
A row of export buttons below the results on the "Calculation" step — this is where a finished cutting map turns into a file for printing, running on a machine, or bookkeeping. The buttons become available right after a successful cutting calculation.
When to use it
- To print the cutting map and take it to the saw or workshop.
- To hand the cutting layout off to a CNC machine or CAM software as a DXF file.
- To keep track of material and parts in Excel — without giving the recipient access to Raspili.
- To print a label for every part so they don't get mixed up during assembly.
Where it is
Cutting-project wizard → the "Calculation" step → below the results, after a successful calculation
A quick PDF or DXF export without opening the project is also available from the action menu on the "My projects" page.
How to use it
Available on any plan; the button shows "Generating PDF…" while the file is being built.
The PDF contains a cutting map for every sheet and offcut.
The "Export to DXF" dialog opens with the file settings.
Part contours, cut lines, offcut contours, part labels, drillings, grooves — each can be toggled on or off separately.
Order — as entered, by X axis, or by Y axis; orientation — the origin corner and an optional 90° sheet rotation; delivery — a ZIP with one DXF per sheet, a single combined DXF, or a DXF for one chosen sheet.
The dialog's settings are remembered in the browser — you won't need to set them up again next time.
The "Print part labels" dialog opens.
Ready-made sticker-size presets in mm, plus a custom column count.
"Sequential" numbering across the whole project, or "Per sheet" — matching the cutting map; a label can also include a QR code, a part sketch, and the cut size.
The number of labels to print is shown right in the dialog, above the buttons.
Available on any plan; no dialog needed — the file is built and downloaded right away.
Overview, sheets, parts, drillings, fasteners, remnants, and waste — details in the interface section below.
The button next to the project name — covered in detail in the "Creating a cutting project" article. The recipient opens the project in a browser and can download whichever format they need themselves.
Interface overview
The export button row
Appears below the calculation results, four buttons in a row.
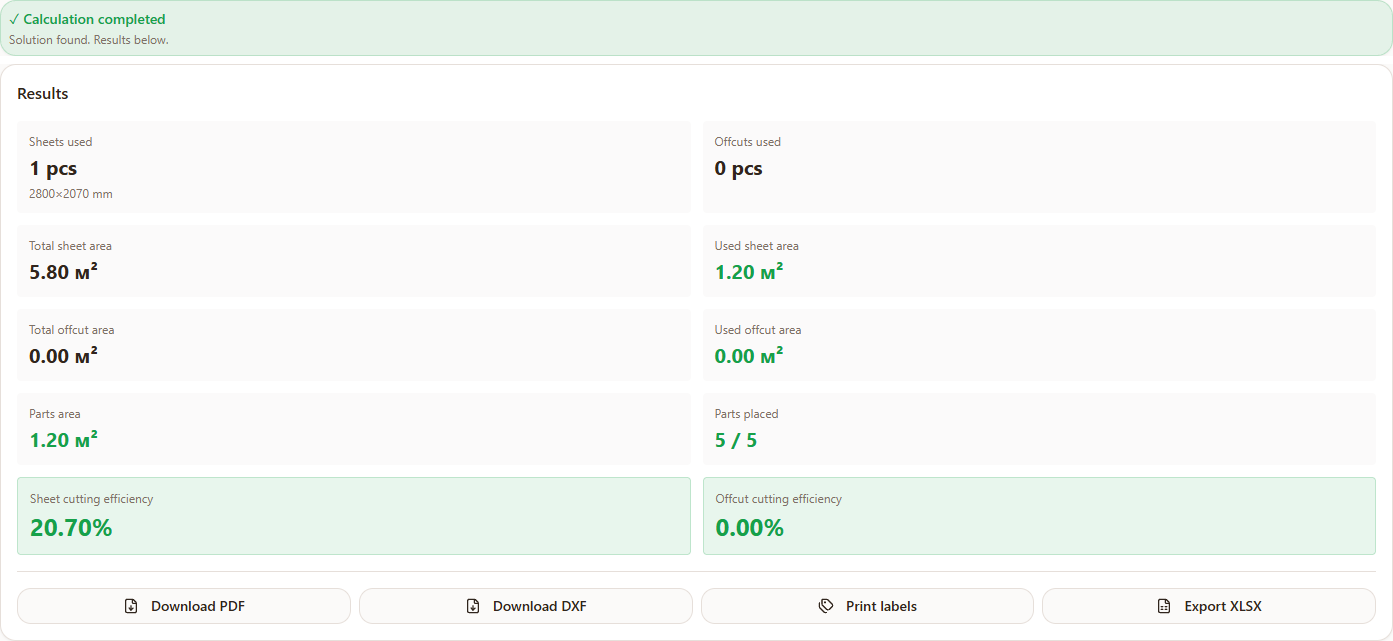
- 1"Download PDF" — free, cutting maps for every sheet and offcut.
- 2"Download DXF" — Pro only, opens a dialog with file settings for CNC and CAM.
- 3"Print labels" — Pro only, opens the part-label settings dialog.
- 4"Export XLSX" — free, downloads a spreadsheet with no settings dialog.
On the free plan, "Download DXF" and "Print labels" show a Pro badge; tapping either opens an offer to upgrade instead of the actual export.
The "Export to DXF" dialog
Every size in the file is in millimeters.
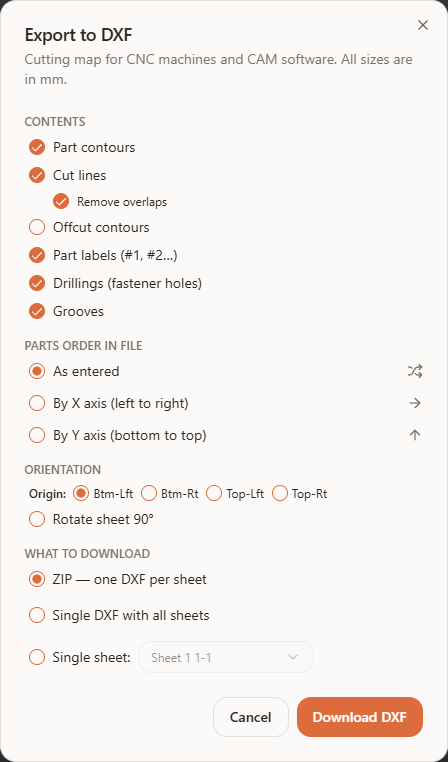
- 1"Contents" — checkboxes: "Part contours", "Cut lines" (with a "Remove overlaps" sub-option), "Offcut contours", "Part labels (#1, #2…)", "Drillings (fastener holes)", "Grooves".
- 2"Parts order in file" — "As entered", "By X axis (left to right)", "By Y axis (bottom to top)".
- 3"Orientation" — "Origin" (Btm-Lft / Btm-Rt / Top-Lft / Top-Rt) and a "Rotate sheet 90°" checkbox.
- 4"What to download" — "ZIP — one DXF per sheet", "Single DXF with all sheets", or "Single sheet:" with a specific sheet picked from a list.
The "Print part labels" dialog
A tag for every physical part: order, material, dimensions, QR code, and sketch.
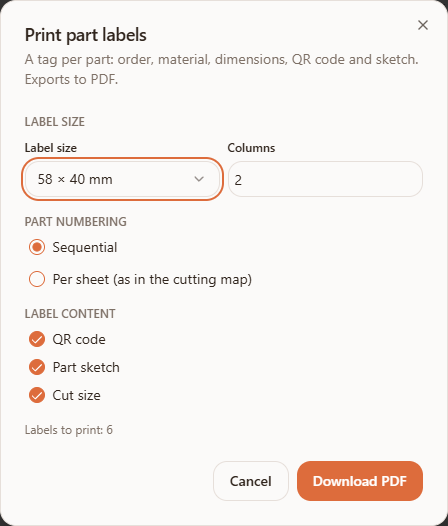
- 1"Label size" — "Label size" from ready-made presets in mm, plus how many columns per sheet.
- 2"Part numbering" — "Sequential" (one continuous numbering across the whole project) or "Per sheet (as in the cutting map)".
- 3"Label content" — checkboxes "QR code", "Part sketch", "Cut size"; the part name, sheet, and order number always print.
- 4"Labels to print: N" — a counter above the buttons showing how many labels will be in the file.
What's inside the Excel file
A single workbook with several tabs:
| Tab | What's in it |
|---|---|
| "Overview" | Order number, calculation date, material, brand, color, thickness, sheet and part totals, cutting priority and mode, start point, kerf width, edge margin, length per edging type, comment. |
| "Sheets" | Sheet name and number, size, material, brand, color, thickness, total and used area, remnant and waste area, the list of parts on each sheet. |
| "Parts" | Part name and size, quantity, rotation, edging on every side (L1, L2, W1, W2), and which sheet or offcut it's on. |
| "Drillings" | Part number and name, size, fastener holes (type, through/blind) and grooves for each part. |
| "Fasteners & hardware" | Name and quantity of hardware carried over from the 3D designer, if the project came from there. |
| "Remnants" | Remnant size, which sheet or offcut it's from, area. |
| "Waste" | Name and size of each waste piece. |
Possible errors
| What you see | Why it happens | How to fix it |
|---|---|---|
| The export buttons are disabled or missing | No cutting calculation has run yet, or it was cleared by a settings change | Go to the "Calculation" step and tap "Calculate". |
| "No data to export" | Trying to open the DXF dialog without a finished calculation | Run the cutting calculation with "Calculate" first. |
| "Select a sheet" | The DXF dialog is set to "Single sheet:" mode, but no sheet is picked in the dropdown | Pick a specific sheet from the list next to that option. |
| "PDF file is empty or wasn't created" / "PDF export failed" | A hiccup while building the PDF, e.g. due to an unstable connection | Try "Download PDF" again. |
| "Couldn't save DXF. Please try again." | A hiccup while building or saving the DXF file | Try the export again; if it keeps happening, try turning off some layers under "Contents". |
| "No placed parts to label" | The cutting map has no placed parts at all — for example, all of them were skipped during calculation | Check the "Parts placed" result and add more material if needed, then recalculate. |
| "Couldn't build labels. Please try again." | A temporary hiccup while building the labels PDF | Try "Download PDF" again in the labels dialog. |
| "Excel export failed" | A temporary hiccup while building the spreadsheet | Try "Export XLSX" again. |
| "Download DXF" and "Print labels" open an upgrade-to-Pro offer | Both features are Pro subscription only | Upgrade to Pro, or use the free PDF and XLSX exports instead. |
Tips
- Set up your DXF options once — Raspili remembers the chosen layers, order, and orientation in the browser, so they're already set for your next export.
- Pick "ZIP — one DXF per sheet" if you need to load one sheet onto the machine at a time — no need to split a combined file by hand.
- Print labels after making manual edits in the editor — the numbers on the labels should match the final layout, not the first automatic calculation.
- Send Excel files to clients and contractors without Raspili access — the file has every size and material needed to double-check the quote.
Frequently asked questions
Why are the export buttons disabled?
Export only becomes available after a successful cutting calculation. Go to the "Calculation" step and tap "Calculate".
Which export formats are free, and which need Pro?
PDF and Excel (XLSX) are available on any plan. DXF for CNC and part-label printing require a Pro subscription.
What's in a DXF file?
Whatever layers you choose in the export dialog: part contours, cut lines, offcut contours, part labels, drillings, and grooves — all sizes in millimeters.
What's the difference between "ZIP — one DXF per sheet" and "Single DXF with all sheets"?
The ZIP is handy if you need to load individual sheets onto the machine one at a time; a single combined DXF works if your CNC software can handle every sheet in one file at once.
Can I print labels for only some of the parts?
There's no way to pick individual parts in the dialog — labels are printed for every placed part at once; extras can simply go unused during assembly.
Why is the "Fasteners & hardware" tab in the Excel file empty?
It's only filled in for projects handed off from the 3D furniture designer, where hardware data exists. For a project created directly in the cutting tool, the tab stays empty.
Do I need to save the project before exporting?
No — PDF, DXF, labels, and Excel can all be downloaded without saving; they're built from whatever's currently on screen. Saving is only needed for the "Share" link button.