
Sheets, parts, offcuts
How to add sheet materials and offcuts, enter parts with quick add or manually, and set rotation and edging for each part.
What this page is
The "Sheets", "Parts", and "Edging" steps of the cutting wizard — where you describe the raw input for the layout: what to cut from (sheets and offcuts) and what to cut (parts, with sizes, rotation, and edging). This is exactly the data the algorithm uses on the "Calculation" step to build the cutting map.
When to use it
- To record which sheet materials you have available — both new stock and offcuts you already own.
- To quickly enter a list of parts with their sizes, without opening a separate form for every single part.
- To lock in a part's grain direction (rotation) and the edging type on the sides that need it.
Where it is
Cutting-project wizard → the "Sheets", "Parts", "Edging" steps
For how to open the wizard itself, see the "Creating a cutting project" article.
How to use it
The "Add a sheet" dialog opens.
The brand and color lists narrow down to match the chosen material type; you can skip the color if no brand is selected.
If catalog thicknesses and sizes exist for the chosen brand, they show up as a list; otherwise, enter the values manually.
The sheet appears in the table; there's no need to enter a sheet quantity — the cutting calculation figures out how many you'll need on its own.
You need at least one sheet first — otherwise you'll see the "Add a sheet first" prompt.
Unlike sheets, an offcut's quantity is entered explicitly — it's a specific piece of material you already have on hand.
This keeps things clear and lets the offcut inherit the parent sheet's material and color.
Fields go in order: length, width, quantity, name — Tab moves to the next field, Enter adds the row and returns the cursor to the start.
Checkboxes for sides L1/L2/W1/W2 appear — you can assign an edging type right away, without going to the separate "Edging" step afterward.
Adds an empty row with zero sizes — type the values directly into the table.
The copy gets the same name with "(copy)" added, plus the same sizes, rotation, sheet, and edging.
"Length" and "Width" lock the part's orientation with no flipping during cutting; with "Auto" the algorithm compares both orientations itself and keeps whichever one fits more parts on the sheet with less waste.
Three buttons: "Length", "Width", "Auto" — applied to the whole list in one click.
Combines rows with the same name, the same size (regardless of which dimension is length and which is width), and the same sheet, adding up their quantities.
The file has columns "Name", "Length, mm", "Width, mm", "Quantity", "Rotation", "Sheet", and the edging thickness for each side.
Only .xlsx and .xls files are accepted; rows with errors — missing a name or an invalid length, for example — are skipped instead of blocking the whole import.
Assigning edging to a part's side, and marking drillings and grooves, are covered separately, with their own screenshots — in the "Edging and drillings" article.
Interface overview
The "Sheets" step
The table of added sheets, and the dialog for adding a new one.
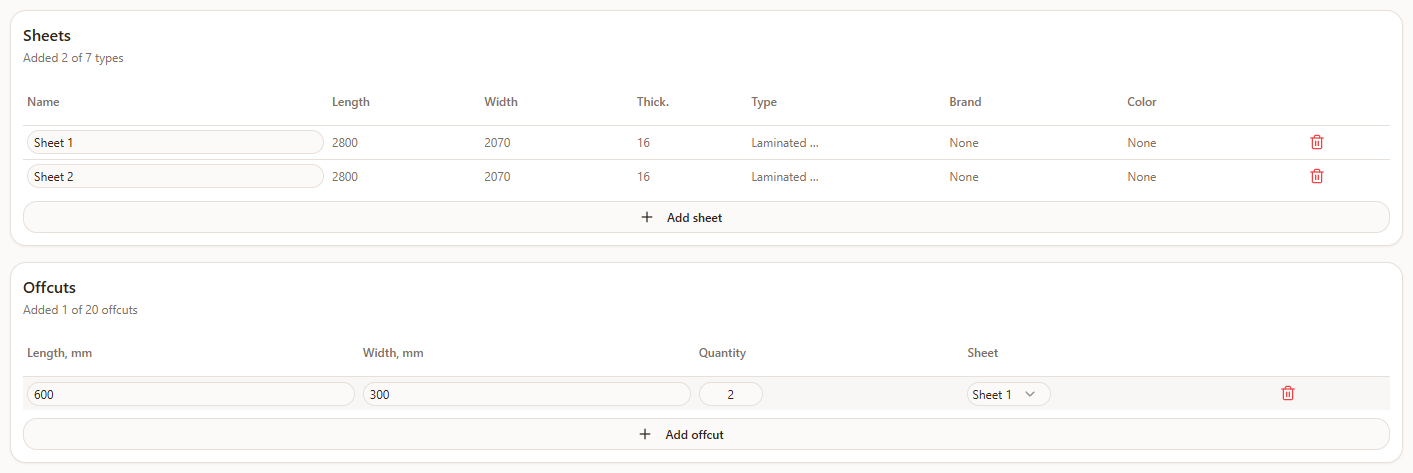
- 1"Sheets" heading — with a counter next to it, "Added N of M types" (or "Free: M sheet types" on the free plan); the exact number of types depends on your plan.
- 2Sheets table — columns "Name", "Length", "Width", "Thick.", "Type", "Brand", "Color"; the name can be edited right in the table.
- 3"Add sheet" — opens the dialog for adding a new sheet type.
- 4"Offcuts" — a separate table below: length, width, quantity, and source sheet; the offcut limit also depends on your plan.
The "Add a sheet" dialog — opened with the "Add sheet" button.
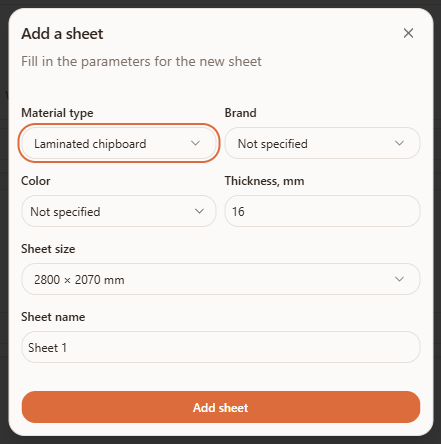
- 1"Material type" — the materials catalog (particleboard, MDF, plywood, and others); "Not specified" skips the choice.
- 2"Brand" — a brand list filtered to the chosen material type.
- 3"Color" — search by name, English name, or HEX code; the selected color has a zoomed-preview button.
- 4"Thickness, mm" — pick from the brand's catalog values, or enter manually if no brand is chosen.
- 5"Sheet size" — the brand's catalog sizes, or one of the base presets (2800×2070, 2440×1220, 2750×1830), or "Custom size" with manual length and width.
- 6"Sheet name" — defaults to "Sheet N", rename it right away or later in the table.
The "Parts" step
Quick add on top, the parts table, and bulk actions at the bottom.
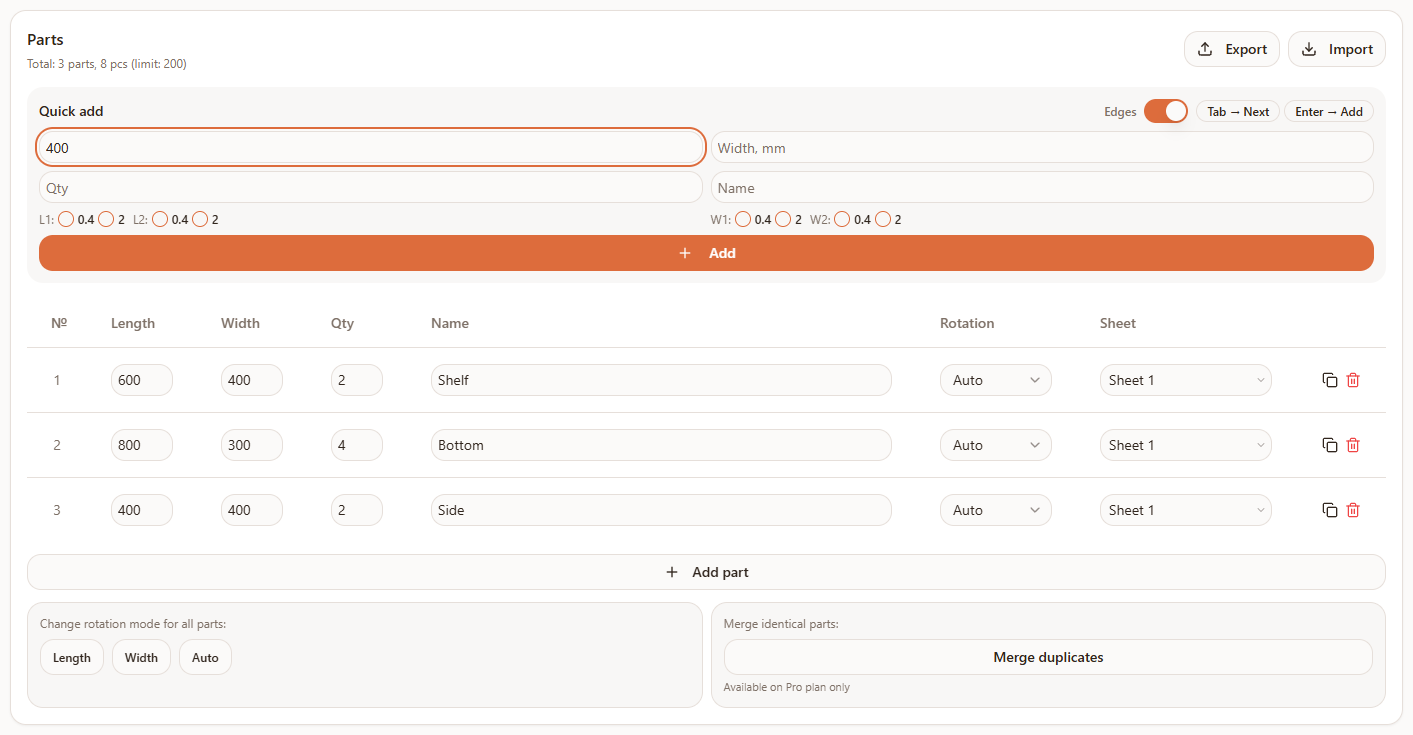
- 1"Quick add" — "Length", "Width", "Qty", "Name" fields in that order; hints "Tab → Next" and "Enter → Add".
- 2"Edges" switch — reveals edging checkboxes for sides L1/L2/W1/W2 right inside the quick-add block.
- 3Parts table — #, "Length", "Width", "Qty", "Name", "Rotation", "Sheet", plus copy and delete icons.
- 4"Add part" — adds an empty row for manual entry.
- 5"Change rotation mode for all parts" — three buttons: "Length", "Width", "Auto".
- 6"Merge identical parts" — the "Merge duplicates" button, Pro plan only.
- 7"Import" / "Export" — at the top of the card, working with the parts list via an Excel file.
The "Rotation" column — "Length" and "Width" hard-lock the part's orientation (for example, because of a grain pattern or material texture direction); "Auto" is a built-in search for the optimal placement: for each such part, the algorithm tries both orientations and keeps whichever packs tighter, regardless of the cutting mode chosen.
The "Edging" step (assigning edging to a part's side) and the "Drillings" step (fastener holes and grooves) follow "Parts" in the wizard, but are covered in detail in a separate "Edging and drillings" article — with its own screenshots and error table.
Possible errors
| What you see | Why it happens | How to fix it |
|---|---|---|
| "Add a sheet first" / "Please add at least one sheet" | You're trying to add a part or offcut before adding any sheet | Add a sheet on the "Sheets" step first, then go back to parts and offcuts. |
| "Sheet type limit reached: {{max}}" | Your plan's limit on distinct sheet types in this project is used up | Delete an unused sheet type, or upgrade to Pro. |
| "Offcut limit reached: {{max}}" | Your plan's offcut limit is used up | Delete an offcut you don't need, or upgrade to Pro. |
| "Parts limit reached: {{max}}" | The project already has the maximum number of part rows for your plan | Delete extra rows, merge identical parts (Pro), or upgrade to Pro. |
| "Only Excel files are supported (.xlsx, .xls)" | The file picked for import is a different format | Export a fresh template with "Export", fill it in, and import it back. |
| "The file is empty" / "No valid parts to import" | The file has no part rows, or none of the rows passed validation | Check that every row has a name, length, width, and quantity filled in. |
| "Row N: missing name" / "invalid length" / "invalid width" / "invalid quantity" | A specific row in the file is missing data or has an invalid value | Fix that row in the file and import it again. |
| "Parts limit exceeded for your plan..." | The number of parts being imported is more than your remaining limit allows | The parts that fit within the limit are still added; upgrade to Pro to add the rest. |
| The "Merge duplicates" button is disabled, with a Pro badge next to it | Merging duplicates is a Pro subscription feature | Upgrade to Pro, or remove duplicate rows by hand. |
Tips
- Enter parts through quick add — using the keyboard with Tab and Enter is noticeably faster than filling in the table row by row with a mouse.
- Download the Excel template if you have a lot of parts — it's easier to prepare the whole list in a spreadsheet on your computer and import it once.
- Enter the offcuts you actually have — combined with the "Use offcuts first" priority (on the "Parameters" step), this cuts down how much new material gets used.
- Only set "Length"/"Width" when rotation genuinely matters — for example, because of a texture or pattern direction; otherwise leave "Auto" on and let the algorithm pick the better orientation for you.
Frequently asked questions
Do I need to enter how many sheets I have?
No. The algorithm works out how many sheets the cut will need on the "Calculation" step — you only describe which sheet types are available to you.
How is an offcut different from a sheet in that sense?
An offcut's quantity is entered explicitly, because it's a specific piece of material you already have — not an unlimited source of new sheets.
What does the "Edges" switch do in quick add?
It reveals checkboxes for sides L1/L2/W1/W2, so you can assign edging right when you add a part, without a separate trip to the "Edging" step.
What's the difference between "Length", "Width", and "Auto" for rotation?
"Length" and "Width" lock the part's orientation with no flipping; "Auto" is a search for the optimal placement: the algorithm compares both orientations of the part and keeps whichever packs tighter with less waste.
How do I merge identical parts?
With the "Merge duplicates" button on the "Parts" step — Pro plan only. Rows with the same name, size, and sheet are combined, with quantities added up.
Why didn't some parts get added during import?
Either those rows in the file had an error (missing name, invalid length, width, or quantity), or importing them would have exceeded your plan's parts limit — either way, the rest of the parts are still imported rather than the whole import being blocked.
How do I move a parts list to another project?
Export the parts to Excel with "Export" in the current project, then import that file with "Import" in the other one.