
Creating a furniture project
How to create a project, add a cabinet and parts, set up a room, and move, rotate and group objects in the 3D designer.
What this screen is for
The 3D designer is where you build a furniture model from parts and ready-made cabinet elements in a 3D scene, before sending it to material cutting. It shows how the future cabinet or unit will look in space, lets you place hardware and interior items, and set the size of every part.
When to use it
- To design a cabinet, cupboard, shelf or other carcass furniture from scratch.
- To see the future furniture in 3D and in a room, before calculating the material cutting.
- To place hardware (handles, legs, rails) and interior items next to the furniture.
- To prepare a project for handoff to cutting or publishing to the community.
Where it is
Bottom app bar → "+" button → "Design"
You can reopen an existing design project from the "Projects" page.
How to use it
A menu with three project types opens.
An empty 3D designer opens with a project called "My design project".
You can rename the project with the pencil icon next to its name in the header.
It's to the left of the 3D scene and open by default.
A ready-made set of parts (sides, bottom, top) is added to the scene, grouped into one block.
A "Vertical"/"Horizontal" panel, a shape from "Shapes", a hardware item or an interior item — each becomes a separate object in the scene.
Its dimensions, move handles, and a small toolbar with rotate and lock buttons appear above it.
Drag the object by its move handles, or, once it's selected, use the ↑↓←→ keys on your keyboard.
The buttons above the object and "Rotate 90°" in the right-hand panel turn it 90° per click; the "Custom rotation (°)" field sets any angle on each axis.
The lock icon above the object, or the "Lock" checkbox in the right-hand panel — the object stays in place but can still be selected and unlocked at any time.
The room settings dialog opens.
Sizes range from 500 to 10,000 mm per side.
You can later toggle the room's visibility with the switch next to "Room" without reopening the dialog.
Interface overview
The designer screen has three zones: the object library on the left, the 3D scene in the middle, and the parameters of the selected object on the right.
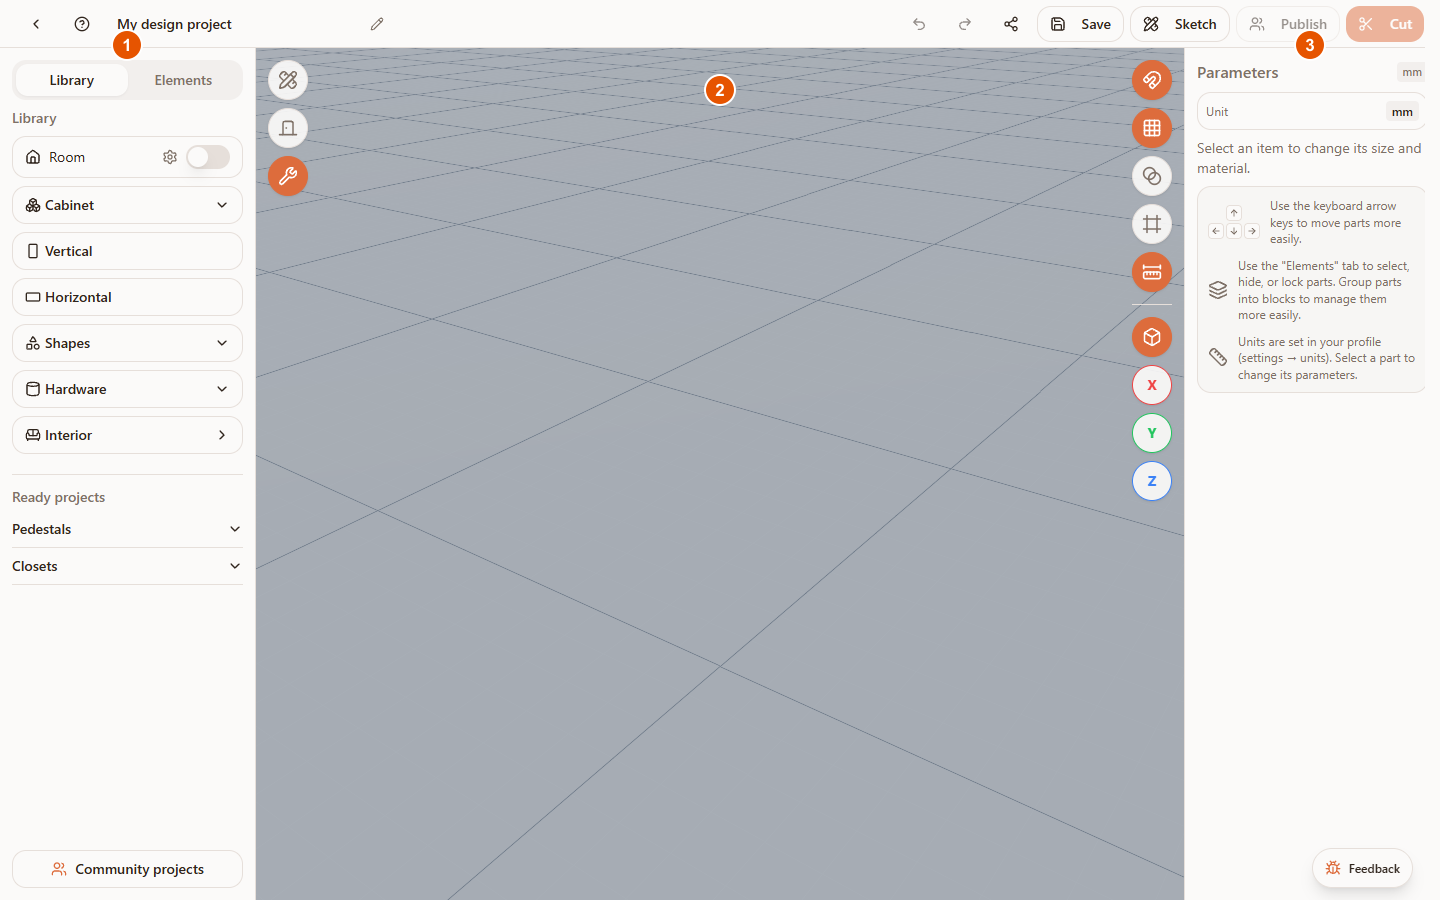
- 1"Library" — where you add objects to the scene; the second tab, "Elements", lists objects already added.
- 23D scene — the work area with the model; here you move, rotate and select objects.
- 3"Parameters" — size, material and settings of the selected object; shows a general hint while nothing is selected.
The "Library" tab
This is where every object on the scene comes from.
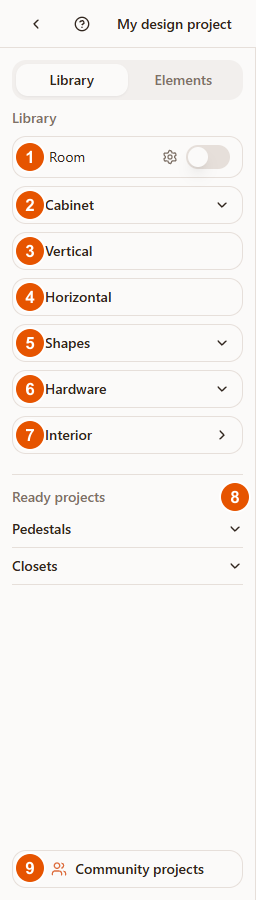
- 1"Room" — a switch to show the room, and a gear icon to set its size, walls and floor.
- 2"Cabinet" — 5 ready-made carcass variants: open, with plinth, with facade, on legs, drawer unit. Each adds several parts at once as one block.
- 3"Vertical" — a single vertical panel part.
- 4"Horizontal" — a single horizontal panel part.
- 5"Shapes" — simple 3D shapes (cube, sphere, cylinder, cone, pyramid and others), useful for non-standard elements.
- 6"Hardware" — legs, handles, rails, hangers, mirror, glass.
- 7"Interior" — interior items (home furniture, appliances, plumbing, lighting and others) — opens a separate window with categories.
- 8"Ready projects" — a catalog of ready-made assemblies (cabinets, wardrobes and others) that can be added to the current scene whole.
- 9"Community projects" — a separate button at the bottom of the screen, opens a gallery of projects published by other users, with an option to load one into your own scene.
The five "Cabinet" variants are a quick way to get a furniture carcass without assembling it by hand from separate panels.
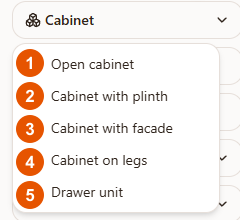
- 1"Open cabinet" — a box with no facade: sides, bottom, top, back panel.
- 2"Cabinet with plinth" — the same box, raised on a plinth.
- 3"Cabinet with facade" — a box with a closing door.
- 4"Cabinet on legs" — a box on adjustable legs instead of a plinth.
- 5"Drawer unit" — a box with a pull-out drawer instead of a static section.
The room settings dialog opens with the gear icon next to "Room".
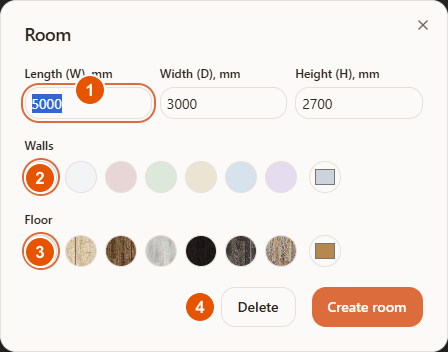
- 1Length, width, height, mm — room size, 500 to 10,000 mm per side.
- 2"Walls" — wall color: 7 preset shades or a custom color from the palette on the right.
- 3"Floor" — floor texture: 7 photo-realistic laminate options or a custom color.
- 4"Delete" / "Create room" — remove the room entirely, or apply the settings you set.
The room shows only 3 walls — the front wall is deliberately left out so it doesn't block the view of the furniture. While the room is on, objects can't be dragged through the left, right and back walls — the scene gently stops movement at the wall.
"Part" and "Block" — what's the difference
A part is a single physical object with its own size, material, edge banding and fasteners: a panel, a shape, a hardware item or an interior item. Parts are what actually go to cutting.
A block is a group of several parts (for example, all the parts of a cabinet) that's convenient to move, rotate and delete as one unit. A block has no geometry of its own — it's simply a grouping of the parts inside it; blocks can be nested inside each other.
- Clicking a part or a block in the scene selects the whole object; to select a single part inside a block, click its row in the "Elements" tab, or double-click the part itself in the scene.
- Moving a block moves every part inside it together; moving a single part moves only that part.
- A block has 8 corner handles instead of move arrows, which resize every part inside it at once.
The "Elements" tab — the list of scene objects
Shows a tree of every block and part in the project, letting you select, hide or lock any of them individually.
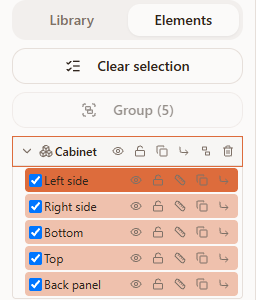
| Icon in the row | What it does |
|---|---|
| Eye | Show/hide the object in the 3D scene without removing it from the project. |
| Lock | Lock movement — the same as the "Lock" checkbox in the right-hand panel. |
| Two sheets (duplicate) | Create a copy of the part or the whole block. |
| "Move to block" arrow | Move the part into another block, or out of the current one. |
| Trash can | Delete the whole block (single parts use the "Delete" button in the right-hand panel). |
The "Group" button at the top of the panel combines several selected parts into a new block; "Ungroup" in the right-hand panel of a selected block does the opposite.
The "Parameters" panel for a single part
Appears on the right when a single part (not a block) is selected.
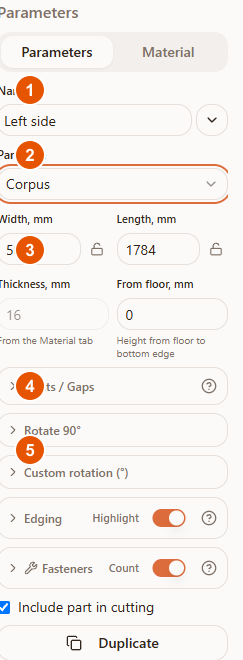
- 1"Name" — a custom name for the part; the dropdown next to it quickly switches to another part already added.
- 2"Part type" — the part's role in the construction (side, bottom, shelf and others) from the Raspili catalog; affects fastener calculation.
- 3Width, length, thickness, height from floor — the part's dimensions in mm; thickness comes from the "Material" tab.
- 4"Insets / Gaps" — how much bigger or smaller the part is than its nominal size on each side (overhang outward or gap inward); see the "?" hint next to the heading for details.
- 5"Rotate 90°" and "Custom rotation (°)" — quick 90° rotation buttons, or a precise angle in degrees on each axis.
Facade style
When a part is set to the "Facade" type, a "Facade style" section appears in the parameters — the milling on the front face. The button with a thumbnail opens the catalogue of styles, split into sections:
- 1"Slab" — a plain panel and a facade with a semicircular finger-pull along the top edge.
- 2"Milled" — single groove, double groove, beveled frame, stepped frame, baguette, ornate frame.
- 3"Shaker" — framed facades with visible stile and rail joints: vertical, horizontal and narrow.
- 4"Raised panel" — a raised centre panel: classic, cathedral, stepped, with a narrow frame.
- 5"Glass and lattice" — glass in the opening, 2×3 and 3×4 muntins, vertical bars, diamond lattice, louvered facade.
- 6"Reeded" — flutes across the whole face (fine or wide) and reeds inside a frame.
The chosen style shows on the model straight away, its thumbnail stays in the part parameters and it is saved with the project. The milling is decorative: part size, edging, specification and cutting layout stay the same — the facade goes into the layout as a rectangular blank.
Below are the "Edging" and "Fasteners" sections — covered in detail in the "Materials, chipboard colors and edging" and "Fasteners and drilling" articles, along with the "Material" tab, covered in "Materials, chipboard colors and edging".
The "Parameters" panel for a block
Appears on the right when a whole block is selected.
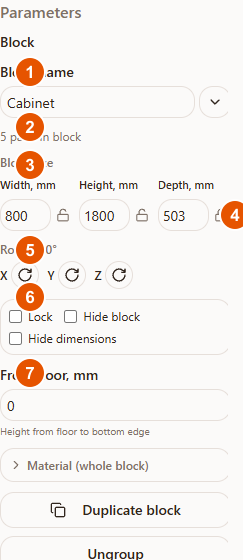
- 1"Block name" — a custom name for the block.
- 2"N parts in block" — how many parts the block combines.
- 3"Block size" — width, height, depth — the block's overall dimensions; changes resize every part inside it proportionally.
- 4Lock icons next to the sizes — lock a specific dimension (width, height or depth) separately from the others.
- 5"Rotate 90°" on X/Y/Z — rotates the whole block as a rigid body around its center.
- 6"Lock" / "Hide block" / "Hide dimensions" — locking movement, visibility and dimension lines for the whole block at once.
- 7"From floor, mm" — height from the floor to the block's bottom edge.
Possible errors
| What you see | Why it happens | How to fix it |
|---|---|---|
| "Project limit reached" | Your plan has run out of saved projects | Delete unused projects on the "Projects" page, or upgrade to Pro — see the "Tariffs and Pro subscription" article. |
| "Part limit reached: N" | The project already has the maximum number of parts allowed on your plan | Delete extra parts, merge duplicate parts, or upgrade to Pro. |
| A part or block won't move when dragged | The object is locked | Unlock it with the lock icon above the object, or the "Lock" checkbox in the right-hand panel. |
| A selected object has no move handles | Either it's a block (blocks have corner resize handles instead of move arrows), or the object is locked | Use the corner handles or the Parameters panel for a block; unlock a locked part first. |
| An object can't be dragged through a room wall | This is expected — an enabled room keeps objects inside its walls | Turn the room off with the switch in "Library" if the walls are in your way right now. |
Tips
- Group the parts of one assembly into a block — it's then easier to move, rotate or delete them together without losing a single part.
- Keep the room on while placing furniture against walls — it's easier not to miss the room's real dimensions.
- Use "Custom rotation" for precise angles, instead of pressing "Rotate 90°" several times to land on the angle you need.
- Save your project regularly — with the "Save" button or Ctrl+S.
Frequently asked questions
What's the difference between a block and a part?
A part is a single physical object with its own size and material — it's what goes to cutting. A block is just a group of parts for convenient joint movement; it has no geometry of its own.
How do I select a single part inside a block?
Click its row in the "Elements" tab, or double-click the part itself in the 3D scene.
How do I ungroup a block?
Select the block and click "Ungroup" in the "Parameters" panel on the right.
How do I remove the room?
Turn off the switch next to "Room" in the "Library" tab, or click "Delete" in the room settings dialog.
Why can't I move a part?
It's most likely locked. Unlock it with the lock icon above the object, or the "Lock" checkbox in the right-hand panel.
Where do I change a part's material, color and edge banding?
In the same "Parameters" panel, under the "Material" tab and the "Edging" section — covered in detail in the "Materials, chipboard colors and edging" article.
Where do I set up fasteners between parts?
In the "Fasteners" section of the "Parameters" panel — covered in detail in the "Fasteners and drilling" article.
How do I send a finished project to cutting?
With the "Cut" button in the designer's header — covered in detail in the "Sending a project to cutting" article.