
Materials, board colors and edging
How to pick a material, brand, sheet size and thickness, set a catalog or RAL color, and configure edge banding for each side of a part.
What this tab is for
The "Material" tab in the parameters panel sets what the selected part is physically made of: board type, brand, sheet size and thickness, color. The "Edging" section next to it, under "Parameters", decides which edges of the part get edge banding.
When to use it
- To set a part's real material and color before cutting.
- To pick a color from a brand's catalog or by RAL code.
- To decide which edges need banding and which don't.
- To recolor several parts of the same block at once.
Where it is
Select a part → the "Parameters" panel on the right → the "Material" tab (edging is under "Parameters")
How to use it
It's next to "Parameters" in the right-hand panel.
Chipboard, MDF and other sheet materials from the Raspili catalog.
Once you pick a brand, its real sheet formats, thicknesses and color palette load in.
The list depends on the brand; without a brand you get standard sizes and a free-entry thickness field.
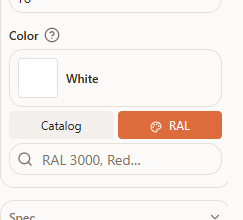
"NSI" searches the brand's catalog colors with a texture photo; "RAL" searches by RAL code or color name.
You'll see the part's 4 sides: L1, L2 (long) and W1, W2 (short).
Raspili decides on its own whether a side needs banding, based on whether it's pressed against a neighboring part, covered by a panel behind it, or resting on the floor.
Pick "None" to explicitly remove banding, or a specific tape type — auto mode then stops managing that side.
Colored lines appear along the edges on the 3D model — each line's color matches that side's label in the panel.
Interface overview
The "Material" tab is a chain of dropdowns, top to bottom.
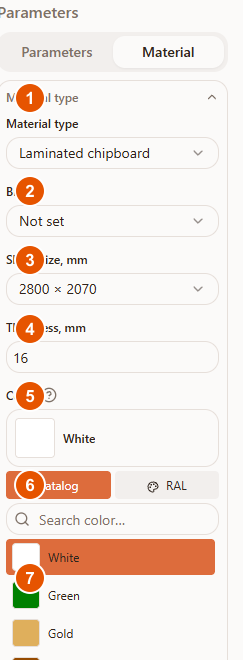
- 1"Material type" — chipboard, MDF and other sheet materials from the catalog; "Not set" by default.
- 2"Brand" — brands that offer the chosen material type; can be left as "Not set".
- 3"Sheet size" — the brand's sheet formats, or standard sizes plus "Custom size" without a brand.
- 4"Thickness" — the brand's thickness list, or a free-entry field without a brand.
- 5"Color" — the currently selected color; the "?" icon next to it opens an explanation of how color selection works.
- 6"NSI" / "RAL" tabs — switch the color source between the Raspili catalog and the international RAL palette.
- 7Color list — with a search field; each "NSI" color shows a texture thumbnail that enlarges on hover.
The "RAL" tab searches by code (e.g. RAL 3000) or color name.
The "Edging" section — a part's 4 sides, each with a colored marker, a status, and a dropdown.
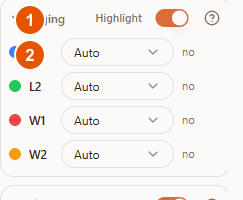
- 1"Highlight" — turns on colored edge-banding lines on the selected part's 3D model.
- 2L1, L2, W1, W2 — the part's 4 edges (long and short); the marker color matches the highlight color on the model. To the right of the dropdown is a status, "yes"/"no" — the result of auto-detection for the part's current position.
Each side offers "Auto" (Raspili decides), "None" (banding explicitly off), or a specific tape type — "PVC edge 0.4 mm"/"PVC edge 2 mm" (banding explicitly on). Once a side is overridden manually, auto mode stops managing it, even if the part is later moved.
The exact width, color and specific tape article are picked later, in the "Edging" step of the cutting builder — here, in the designer, you only decide whether a side has banding or not.
Possible errors
| What you see | Why it happens | How to fix it |
|---|---|---|
| The "Brand" list is empty or shows only "Not set" | No brand in the catalog currently offers the chosen material type | Pick a different material type, or leave the brand as "Not set" and set size/thickness/color manually. |
| The "Edging" section is inactive, every side shows "None" with no way to change it | The part's material isn't a board material (glass, metal, acrylic, countertop) | This is expected — edge banding only applies to chipboard/MDF/HDF. |
| Banding unexpectedly appeared or disappeared after moving a part | The side was set to "Auto", and the part's new position changed the auto-detection result (it pressed against a neighbor, or moved away from one) | Override the side manually ("None" or a specific tape type) if you need a fixed result. |
| A color isn't found by RAL code | A typo in the code, or that shade isn't in the RAL database | Double-check the code (e.g. RAL 3000), or search by a similar color name instead. |
Tips
- Pick a brand if it matters for the order — sheet sizes and thicknesses will then be real, without manual guessing.
- Don't touch "Auto" on edging unless you need to — Raspili correctly removes banding from sides pressed against neighboring parts on its own.
- Turn on "Highlight" for tricky cases — colored lines on the model show where banding currently is faster than reading the table.
- Change the material for a whole block at once — you don't have to recolor each part one by one.
Frequently asked questions
What's the difference between the "NSI" and "RAL" tabs?
"NSI" is the Raspili color catalog with texture photos, usually tied to a brand. "RAL" searches the international RAL palette, for when you need an exact industrial shade.
What does "Auto" mean in the "Edging" section?
Raspili decides on its own whether that side needs banding, based on whether it's pressed against a neighboring part, covered by a panel behind it, or resting on the floor. The "yes"/"no" status under the dropdown shows the current result.
Why can't I set edge banding on glass or a countertop?
Edge banding only applies to board materials — chipboard, MDF, HDF. On other materials every side is always "None".
Can I set the exact width and article number of the edge tape in the designer?
No — here you only decide whether a side has banding or not. The width, color and specific article are picked later, in the "Edging" step of the cutting builder.
How do I recolor a whole block instead of one part?
Select the whole block — the "Material" tab shows the same material and color pickers, but now applied to every part in the block at once.