
Cutting map editor
How to manually adjust a finished cutting map: move and rotate a part, move it to another sheet via the buffer, set up the canvas display, and check remnants and waste.
What this page is
The "Editor" step of the cutting wizard — the visual cutting map the algorithm produced on the "Calculation" step. Here you can adjust the layout by hand: move a part, rotate it, move it to another sheet or offcut, and see what usable remnants and waste come out of the layout.
When to use it
- To manually adjust the layout if the automatic result isn't perfect — for example, to shift a part closer to the edge.
- To move a part from one sheet to another, if that makes the order easier to assemble.
- Before printing or exporting, to check how much useful material is left as usable remnants rather than waste.
Where it is
Cutting-project wizard → the "Editor" step
Only available after a successful calculation on the "Calculation" step, and hidden when viewing someone else's project.
How to use it
"Sheets (N)" or "Offcuts (N)" — layouts on sheets and on offcuts are shown on separate canvases, N is how many exist in the current calculation.
A small circular rotate button appears in its corner.
Its position is constrained to the sheet's bounds; if snap is on, the part is pulled toward neighboring parts and the sheet edge.
Its length and width swap; tapping again within a fraction of a second won't do anything — that's a guard against an accidental double rotation.
The "Parts buffer" panel appears on the right.
The part temporarily leaves its current sheet for the buffer, without deleting anything from the project.
Tapping a part in the buffer places it automatically; dragging it sideways places it at a specific spot on the canvas.
Zoom changes in steps from 25% to 300%.
Movement lock, snap, edging display, color/black-and-white scheme, dimension display — covered in detail in the interface section below.
Interface overview
The "Tools" panel
Six toggle buttons plus zoom controls.

- 1Lock icon — "Lock movement" / "Unlock movement"; while on, parts on the canvas can't be dragged.
- 2"Package" — opens and closes the "Parts buffer" panel.
- 3Magnet — "Snap (magnet)"; turns on attraction of a dragged part toward neighbors and the sheet edge.
- 4Frame — "Edges"; shows or hides edging marks on parts.
- 5Palette — "Color scheme"; switches the canvas between color and black-and-white.
- 6Ruler — "Dimensions"; shows or hides size labels on parts.
The cutting canvas
The main work area showing the cutting map.
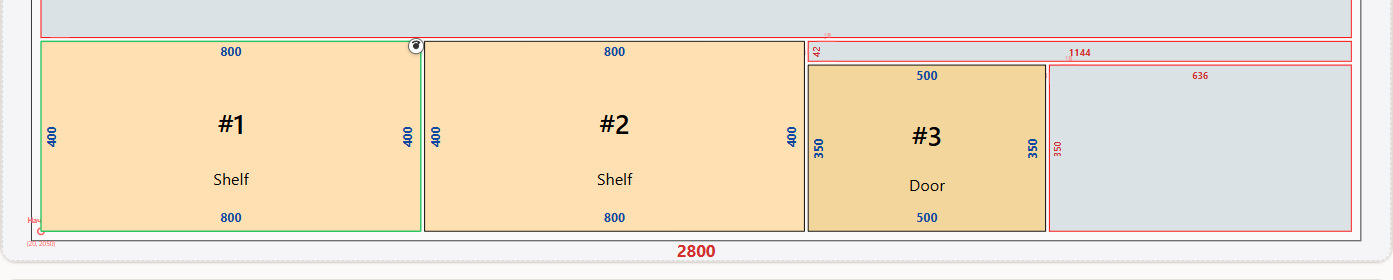
Until a calculation has run, the canvas is replaced by a hint: "Cutting not yet calculated" / "Go to the \"Calculation\" tab and press \"Calculate\"". If the selected tab ("Sheets" or "Offcuts") has no data, you'll see "No sheets to display" / "No offcuts to display" with a suggestion to switch tabs or run the calculation.
The "Parts buffer" panel
Opened with the "Package" icon; holds parts temporarily, only for the current browser session.
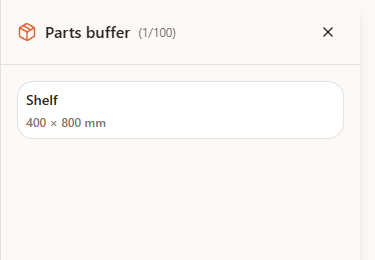
- 1Empty buffer — "Buffer is empty" / "Drag parts from the canvas here".
- 2A part card in the buffer — name, size, and "Quantity: N" if several identical parts are in the buffer.
- 3Hint "Drag sideways to a sheet · tap to auto-place" — how to put a part back on the canvas.
- 4Remove icon — "Remove from buffer" on a part's card.
- 5"Clear buffer" — removes every part from the buffer at once; the buffer holds up to 100 parts.
The "Remnants" and "Wastes" cards
Below the canvas, showing what's left of the sheets and offcuts after the layout.
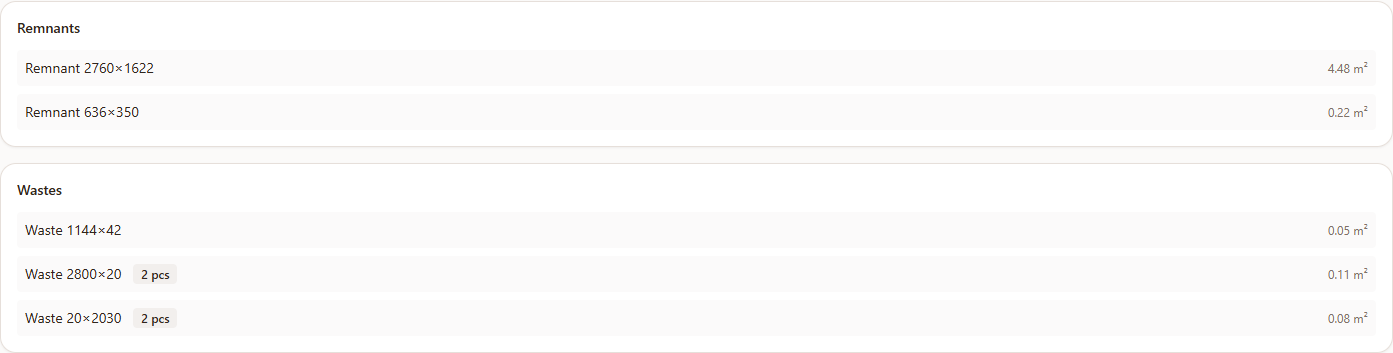
- 1"Remnants" — pieces larger than the minimum size from your profile; usable as offcuts in future projects. Row format: "Remnant L×W", with quantity and area in m² next to it.
- 2"Wastes" — pieces smaller than the minimum size, plus the trim strips along the edge margins, which aren't good for anything; same row format, "Waste L×W".
The lists are calculated separately for the "Sheets" and "Offcuts" tabs — switch tabs to see the remnants and waste for offcuts.
Possible errors
| What you see | Why it happens | How to fix it |
|---|---|---|
| "Cutting not yet calculated" | No calculation has been run yet on the "Calculation" step | Go to the "Calculation" step and tap "Calculate". |
| "No sheets to display" / "No offcuts to display" | The calculation didn't use any sheets, or respectively any offcuts | Switch to the tab that has data, or add offcuts on the "Sheets" step and recalculate. |
| A part doesn't move when dragged | Movement lock is on (the lock icon in the "Tools" panel) | Tap the lock icon again to unlock movement. |
| No rotate button shows on a selected part | Movement lock is likely on — rotation is unavailable too while it's active | Turn off the lock with the lock icon. |
| A part moved to the buffer disappeared from every sheet | Expected behavior — a part in the buffer counts as temporarily removed from the layout, not deleted from the project | Put the part back on any sheet or offcut — by tapping its card in the buffer or dragging it. |
Tips
- Keep snap turned on while making manual adjustments — neighboring parts line up more cleanly with each other and the sheet edge.
- Lock movement once you're happy with the layout — this protects against accidentally nudging a part while working on the canvas on a phone or tablet.
- Switch to the black-and-white scheme before printing — it's easier to judge how the cutting map will look on paper.
- The buffer doesn't persist between sessions — if you close the browser tab with parts still in the buffer, you'll need to place them again after recalculating.
Frequently asked questions
Why is the "Editor" step empty or unavailable?
The editor only shows a cutting map after a successful calculation on the "Calculation" step. If nothing's been calculated yet, you'll see a prompt to go there and tap "Calculate".
How do I rotate a part on the cutting map?
Click the part to select it, then tap the rotate button that appears in its corner — its length and width swap.
How do I move a part to another sheet?
Open the buffer with the "Package" icon, drag the part from the canvas into the buffer panel, switch to the sheet or offcut you want, and put the part back on the canvas.
What happens if I forget to place a part back from the buffer?
It stays in the buffer until the browser session ends and won't be included in an export as placed on a sheet — check that the buffer is empty before exporting.
What's the difference between "Remnants" and "Wastes"?
"Remnants" are pieces larger than the minimum size from your profile, usable later as offcuts. "Wastes" are pieces smaller than that, plus the edge trim strips, which aren't good for anything.
Why can't I move a part?
Movement lock is probably on — the lock icon in the "Tools" panel. Tap it again to unlock.
Do changes made in the editor get saved?
Yes — moving, rotating, and moving parts between sheets are all saved with the rest of the project's changes. Don't forget to tap "Save".